Showing posts with label #pinaddicts. Show all posts

November Pinaddicts Make!

Another month, another crafty challenge using inspiration from pinterest. This month I knew exactly what my focus would be: Thanksgiving. I know I'm not American, Canadian, German but once upon a time Thanksgiving was celebrated in England (thinking back to Henry VIII) but is long something thought of as a tradition done by our friends across the pond. My thinking, however, is that everyday I have something to be thankful for, so this year myself and my family WILL be bringing Thanksgiving into our home. Why not?

To tie in with my Thanksgiving idea of having the family over, I wanted to make a calender like this:

"Give thanks board"... For the month of November. Very cool to do with your kids :)
Click image for original link

The idea (which i had already. I just wanted to see how people had made their own calenders) is to insert a card into an envelope and write something you're thankful for on that particular day. I had some red cards left over from my wedding so I halved them (they're mini cards from Ebay which are great and a perfect size) I used thick cardboard for the back (in the original it is wood which is what I would've done had I been able to get some!)

I covered my cardboard in parcel paper and stuck my halved envelopes onto it. I then used glitter pens to write numbers on the envelopes to make it all sparkly and lovely. I added sequins and hearts to finish the look off before cutting white card into little rectangles and slotting them inside the halved envelopes.
What do you think?


So far we have written: 
1st November
Midge: I am thankful for a really good sleep.
Mummy: For getting all the great Christmas gifts today!

2nd November
Midge: For going out today shopping!
Mummy: For my lovely lay in from Daddy and my delicious tea!
(Daddy works evenings so hasn't written his Thanks yet!)


I hope you like our Give Thanks calender and view some more fab makes from my other fellow Pinaddicts! 


CupcakeMumma

Pinaddicts October - Shadow Boxes

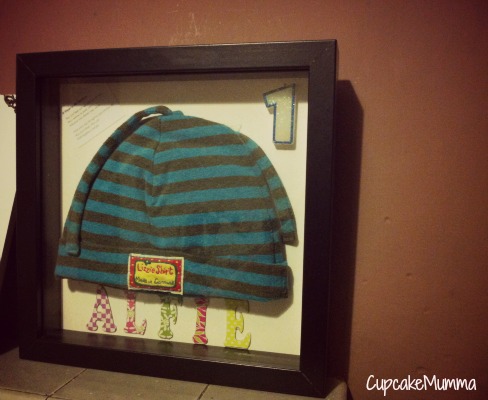
I'm more than a bit slow on posting my Pinterest makes this month but I'm sure I can be forgiven! This month, I wanted to put a few of my favourite items from Midge and Little Man's memory boxes on display and what better way to do this than use shadow boxes?

First off, I needed to source 2 shadow boxes...this proved impossible until my cousin came to the rescue. She lives near an Ikea so bought  me 2 and posted them down. I was going to use them to pop our wedding photos in but had a change of mind when I remembered this fabulous idea.

After I had prepared my shadow boxes, I went through Midge's box first. From her box, I chose a pair of pram shoes which she didn't really wear but they were so cute. I popped them on her once at home when she had a sweet little dress on. I also chose a photo of her asleep in her moses basket which is one of my favourites and added some lovely pink stickers from The Works just to add that little 'finishing touch' to a girly photo frame. I also found her hat which was put on her tiny head at the birthing unit. I never washed that hat and it still smells of newborn (believe me or not!)


Next, we have Little Man's frame. From his box (which ashamedly is more empty- seems you don't collect so much after your first born!) I chose a hat which is made in Cornwall. I picked this hat up from a charity store and loved seeing him in it. I was really gutted when he outgrew it! I also used some letters from an old birthday card of his to spell his name, the candle from his first birthday cake and a small piece of card with a prayer written on which came with his Christening bracelet from his Aunt.


I think they're really sweet and a part from swearing a few times when the back of the frame kept messing me about it was a relatively easy craft to complete. What do you think?
I've linked this up to the monthly Pinaddicts Challenge- do come and see for yourself all the wonderful, crafty goings on.

CupcakeMumma

Pinaddicts Return! August

I was really struggling with Pinaddicts this month but as I was racking my brain wondering what I could do that wouldn't eat up too much time I received an e-mail in my inbox from a craft swap I had signed up to a few months ago. This was ideal so I went into my Pinterest account, had a good browse through my Pinaddicts folder keeping in mind what my swap partner would appreciate and love and well.

As my swap partner enjoys baking this was the perfect idea for her! I bought a case from The Works which was in the sale.
I bought some cake cases, a few extra gifts as part of the swap instructions and bought a select few toppings from my favourite local sweet shop. This included some Cornish fudge which I chopped up (perfect for a vanilla cupcake topping), some mini marshmallows, roasted and chopped hazelnuts for a chocolate and hazelnut cookie and some chocolate buttons. Yummy! I put all these in cellophane type bags to keep them fresh on their journey. Here is the finished result! Complete with some little flags for a real tea party theme!
To add a personal touch I hand made a little card with 2 mini envelopes. Inside I popped a little peice of paper, one with a recipe for a cookie mix I always use and one for a lovely fudge icing.

Pinaddicts now has a lovely new site all of its own so please head on over to check out all the other entrants here!

CupcakeMumma

Pinaddicts June!

Hello! Welcome to another Pinterest Challenge. I'm really disappointed that I haven't found any shadow boxes yet as I've pinned such a wonderful idea and even have a big, empty wall waiting for this Pinterest craft so if you have any ideas let me know!

On to Junes task! I decided to make my Pinaddicts June craft a Father's Day one. So, to come up with something my Dad would love. What better than chocolate?

These are called Candy Bouquets and here is how you make them!


Gather all your items together and start by wrapping some nice tissue paper and cellophane wrap around a cut piece of florist foam, this will hide the unsightly green colour! 
One you've done that, start using strong tape (yes I soon realised my mini sellotape was not 'man' enough for the job) and secure your chocolates to the kebab sticks.
Insert each stick into the foam however you like until you feel it's perfect!
Add some finishing touches if you like, I added a nice blue ribbon I found in my craft box but you could do anything you like!


 Easy! Not the best picture I'll give you that but it survived a buggy walk and 2 bus rides so I don't think it came out too bad! Needless to say Pop loved it and from what I hear, it didn't last too long!!

Yes...He is 'smelling' the chocolate...And maybe kissing it?
 This week the lovely Kerry over at MyLoveBumps is hosting the Pinaddicts Challenge Linky so please link up over there and check out everybody else's! Don't forget to keep your eyes out for #Pinaddicts Tweets too! Now, what to make for July on top of service books and flowers for next months wedding!!

CupcakeMumma x

Pinaddicts May- Never Forget A Birthday!

I didn't know what to make for the month of May so it all happened by chance. I bought a new coat hanger for the kitchen as most of the larger hooks on the old one had snapped off. The problem was, when we went to put the new one up it was too long for the space used previously. With no where else to hang our coats, Other Half simply took the old hooks off and replaced them with the new hooks leaving me with a long length of wood. It was then I knew what my #Pinaddict make would be!

I have decided to make this:

Birthday Board for family


I know I have a calender but I fancied something new, something different so I thought this was a great idea and very pretty depending on what you want your design to be. This is also a recycling project for me can I add!
I had left over pink paint in the shed so set about painting my wood and small wooden hearts I bought from Ebay a week before. I thought they'd be nice and really pretty.
I stuck the hearts on the wood to represent the 12 months of the year, writing the initial of each month on them once safely in place.
After I had stuck the hearts on, I wrote names and dates on the remaining hearts and decorated my board with the word 'Birthday'. As you can see, I had some pen trouble when outlining which I'm a bit disappointed about because it ruins it a bit but never mind.

I used my round nosed pliers to make holes in the hearts for hanging. I'm sure there are proper instruments for this sort of thing but the wood is very thin so my pliers were the best option despite many scraps and jabs when I was a bit over-enthusiastic with the effort! I suffer for my art!

Using some hooks I got to pop up my net curtains some time ago, I was able to hang my hearts using some eye pins from my jewelry bag. This was really fiddly for me, I like making things like this but I really have to take my time as I'm not blessed in the practical department! Still, I got there in the end and added the finishing touches with some card embellishments.
(Sorry for photo quality, my camera ran out of power and the lighting isn't great for my phone!)

Now hanging above my mirror in the hallway


Please link up with SimplyOutnumbered for this months crafty make and don't forget to share on Twitter using #Pinaddicts. Have fun!

CupcakeMumma 

Pinaddicts! Button Heart

I sort of lost the joy of crafting this last month but hopefully with my next project I'll get it back. I didn't really know what to do this month but found a button craft on Pinterest that I thought I'd give it a go.

For this craft I needed:
- Buttons
- White card
- A photo frame
- Some glue
First of all I drew a heart lightly on the card as a rough guide to make sure I didn't end up with a complete fail of a heart! I decided to go for a more unique shaped heart to make the picture look a bit more funky.


When all the buttons were stuck on using some PVA glue I wrote some words at the bottom which I also saw on Pinterest but I seem to have deleted the photo! Anyway, just so you know the words are not my idea they are a total copy.


Love Lives Here
This is now in the entrance to my house with my post and home phone. People see it when they walk out and I've already had some nice comments. Sorry about the picture quality this month folks!

Cupcake Mumma

This week butwhymummywhy is hosting the #Pinaddicts link up. If you're not a blogger you can still share your fab creations by clicking onto the #Pinaddicts Facebook page here!

Pinaddicts March!

I had to have a very quick change of plan this month for Pinaddicts because I couldn't find the materials I needed in time. You may have seen this posted on my blog already so I shall place a link at the end of my blog so you can have a good look at how to make my March Pin!

I decided, seeming as I was throwing my aunt a surprise roast for her retirement I would make her a cheesecake. A vegan cheesecake. I also made it gluten free so i could indulge! I have to say this went down very, very well! So well my sister is coming to stay on Wednesday and she has requested i make one just for us to pig out on because she wasn't well enough to join in the party.

Here is the original pin I found about a week ago. I already kinda knew how to make this kind of cheesecake but I had never made it properly.

And here is mine! To see the recipe and some more pictures please click here!!


Please join in and show off what you have made for the Pinaddicts challenge in March. The lovely Sew Scrumptious is hosting this months Pinaddicts. You can also link up and don't forget to share your post on Twitter using #Pinaddicts so we can find you!

Cupcake Mumma

Pinaddicts in February! A Different Kind of Cake

Woo, another month of crafting down! I had great fun making with February's project but had a hard time keeping it a secret and an even harder time making it perfect. My project has been made as a gift for my sister in law (to be) and my new niece. Okay so more the adorable bundle but I thought of everyone whilst making my creation!
Below I give you the original Pin that I found whilst lurking on Pinterest (probably at the deep, dark unknown hours of the night.)
So pretty and pretty fabulous you're thinking right? It's not too hard to make, not really. Except I wasn't going to do this nappy cake the usual way (i think it's messy-just my opinion) so I decided to follow the pin and do my nappy cake the same way (the awkward but very neat and professional way-again, just my opinion!) If I was braver I would've made a nappy pram but I figured I got in too deep anyway!

Here is what you need:


Plus patience, and time, and skin of frickin steel! (which, by the way I do not have) 

And here is what I came up out with!
The girl done good!

At it's destination!
Very happy, very pleased and it went down a treat which was the best bit. My niece is already just over a week old and this nappy cake still hasn't been broken into. Although at the rate this little bundle poops there will be some emergency break ins pretty soon I should think!

If you fancy making a nappy cake I would recommend doing it this way. Most tutorials (if needed) take you through wrapping the nappies, i chose to pin the nappies flat instead. I had some lovely comments from lots of people about this cake, some even said I should make them properly! It cost about £25 to make this craft with nappies in the sale and pound shop items. I was impressed but I couldn't feel my finger tips for a fair few days (i'm a bit clumsy....and nappies are not easy to pin can I just say!) so I think i'll give the business a miss!

Please check out everyone else's #pinaddicts posts over at Melksham Mum's blog, tweet if you can, post on Facebook and spread some blog (and Pinterest) love!

Cupcake Mumma

#Pinaddicts! The Pinterst Challenge January!

Here we go then, time to unveil our hard work of January's  #Pinaddicts Challenge hosted by the lovely Kerry at LoveBump along with a whole bunch of lovely Pinterest crazy ladies! I thought I'd join and dip my toes in so as to test the waters. I'm not a natural crafter and never plan to be but one thing I do know is how to bake a cake!

Most of you have already seen this on m Project 366 Challenge as it was made for my dear other Half who turned 22 January 24th.

So, here's what a made! A KitKat, Smarties galore chocolate cake!
The original cake is done with M&M's but my lot prefer Smarties. This also means I have to buy less as they're bigger. 
Simply make up your normal cake mix (I don't weigh my ingredients) I cook my cakes at 150 in a fan assisted oven which sounds like it takes a while, and it does, but it's worth it. I always recommend cooking your cakes slower than fast for even cooking.

Once your cake is out, get a damp tea towel if you notice the top of your cake has risen a bit too much. While your cake is in the tin, you can gently push on the damp cloth to get rid of this extra bit of cake! I prefer to do this because, as a perfectionist, it's far easier than getting the cake out and trimming the top which sometimes can go horribly wrong!


So there are some tips that you will never use because, quite simply, baking shouldn't be that picky ! BUT, and yes that is a big but, this was for my fellow Pinaddicts so it had to be great! Oh and um, of course for the Other Half..Oops.

Ice your yummy cake with chocolate icing and pop your KitKats all around the outside. Mine had to be trimmed down as I used a smaller cake tin than the original. I then used some ribbon (hope no one minds chocolate stained ribbon on their wedding invites..?) to make it look 'pretty'. Throw the Smarties onto the top to cover the icing. After popping in a few candles for good measure and a lovely little note I feel I did a good job.

Nobody tell him he's on here haha
Now I'm looking forward to seeing all my other lovely #Pinaddicts hard work and I'm looking forward to February's make which i cannot divulge as it is a surprise for someone I know!
Hope you had fun! *Hands out cake* *Smiles* 
Hannah X
LifeAsIKnowIt