Showing posts with label craft. Show all posts

An Orb Factory Art Mosaic Review!

In the Cupcake House we love a craft (well, nearly of us, Mr B is the odd one out..his loss!) Midge and Little A were so excited when they got home from school and found their Orb Factory craft boxes waiting for them. Little A received a pirate box and Midge a princess themed box. Both boxes are sticky mosaic craft sets! No glue, no mess, just coloured sticky tabs that match the squares to the characters.

Pirate Sticky Mosaic Set

Sticky Mosaic Princess Set

In our kits we had 4 characters ready to decorate, a great selection of coloured square tabs which are plain and glittery (also gems in the princess set), an instruction sheet which helps you match the colours to the numbers on the characters and some stick on plastic type hooks plus several cardboard stands so you can hang two up on a wall and another two can sit proudly on a desk or shelf.

Pirate characters

Dark coloured sticky tabs

Princess characters
Selection of gems and brightly coloured sticky tabs

Midge is just the right age for these craft sets from Orb Factory, she enjoyed taking the time to place the right squares and gems on the right colour square and sharing with me what she thought she'd name the pictures and how much fun she was having. In contrast there was Little A who at 4 is a little young (although some children his age have great fun in matching up colours!) Little A was more happy to dot the squares where he felt they should go and who am I to stop him? As you can see below I did help him (by his request) and I had great fun! It was nice not to lay out newspaper, get glue all over our fingers and have lots of tidying up to do when finished.

Finished pirate character

I love the pink princess one and the woodland princess

Midges favourite character

Bright and woodland themed

I can really recommend these Sticky Mosaic sets (buy them here for £9.99) and I also like the look of Orb factory's other craft sets too so I think they're worth a look. If you purchase these sets i'd love to know what you think! 

We received the Sticky Mosaic sets for free in return for an honest review. All words and photos are as usual my own.

Cupcake Mumma

My Springtime Surprise Gift Swap


I had such a wonderful time joining in with Lucy's swap which was a huge spring time exchange between people from all over the place. For the first time ever my swap partner wasn't to be found on social media or blogging. I had a small amount of information and I really enjoyed just letting myself go for a spring themed box.

Here's what I sent to my swap partner:


My parcel was just beautiful, the photos are all below.

2 postcards for my collection

I adore this exercise book and gel pen- so me!

Postcard! Plus a glass candle holder

Cupcake cases that are wonderfully spring like and this fab sign that's in my room

Lovely cake wraps, flags and decorations

Thank you so much to Sarah and thank you to Lucy for running this rather big swap and cheering a lot of people up with happy mail this month!

Cupcake Mumma

Happiness Jar & Frozen Cake #thecraftingprompt Week 2&3

It's been a while since I messed around with the felt I keep in the kids craft box. I had a brief spell with felting but I'm just not gifted in this type of craft (see also knitting, sewing and crotchet!) but still, I can cut out felt and find all sorts to decorate with and that's just what I've done for the second crafting challenge prompt of felt.

I wanted to make a happiness jar to pop all those random happy thoughts onto paper and place them into the jar. I'll then open the jar at the end of 2015 and read them all back! I've simply just stuck chosen coloured felt and buttons on my little jar (which once contained Apple sauce. I'd go for a bigger one if I was you but it's all I had available) and I had some fabric paint I used to 'write' on the felt and this lovely pendant I found in a craft box. I've had it for years so I'm pleased to finally have a use for it.


The next prompt is Spoons. I thought I'd post a photo of my recent Frozen inspired birthday cake for this one (after all, baking is done with wooden spoons in this house still!) I used a well known recipe of 6, 6 and 6oz flour, caster sugar and butter and 3 eggs. Then I used some baking powder and a couple of tablespoons of coco powder. All of this was milk and gluten free. The icing is a bought icing because it is so utterly delicious and the wonderful design on top was a great eBay find costing around £3. *Tip* Pop your rice/sugar papers into the freezer for a few minutes to make the removal super easy and minimise tearing! They are so delicate to handle.


Next time the prompt is Googly Eyes so look out for that post this week!
Link up and take a peek with Let Them Be Small by clicking the badge below.


Let them be small

Cupcake Mumma

Homemade Lanterns

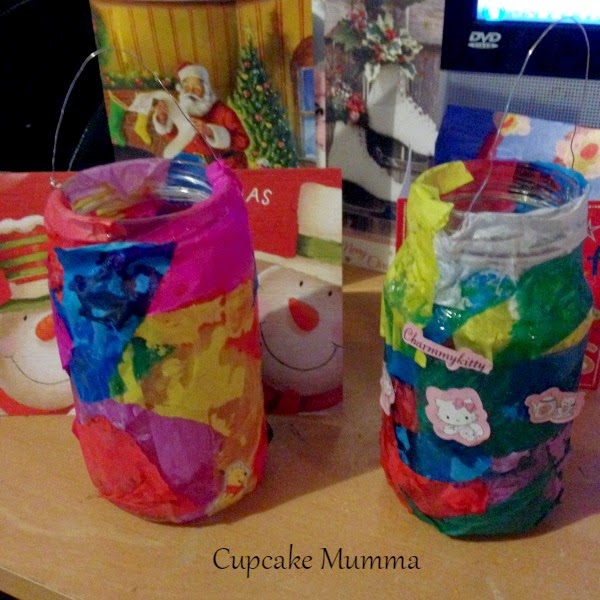
I've never made homemade lanterns before so thought I'd give it a try with the little ones! It was a rather spontaneous decision to make these, so I'm not going to say I'm absolutely right in the materials I've used, but we used what we could find and we had fun!

I recently acquired a craft box full of fantastic bits and bobs. We dug through it to find all the tissue paper i'd stuffed in a pouch and we selected our favourite colours, which we then set about tearing small pieces from until we had a little pile sat on our table. I popped some PVA glue in an old Haribo container so there was no squabbling over it. The previous night I had washed and removed the stickers from 2 old jam jars so we were ready to go! ( I actually wound some gold jewelry wire around the neck of the jars before the children set about decorating them)

drying before adding the candles

Midge and Little A (with my help- because I couldn't resist!) stuck the tissue paper randomly to their jars and then covered the paper with more PVA so the paper wouldn't rip and come off the jar. It all dried pretty quickly and they stuck some stickers on their jars so they could tell whose was whose. We waited until outside had gotten a bit darker and dull, then we drew the curtains and switched the lights in the playroom off. I was so pleased with the results!

Midges lantern


A quick photo before heading to the playroom!

They work! Naturally not a very clear photo in that light, but you get the idea!

 I had so much fun doing this craft with the little ones and I can't wait to make it again the future, they are both up for it. Why not give it a go yourselves? Perhaps a nice craft to see the New Year in? Speaking of crafts, i'm going to be joining in with Let Them Be Small over 2015 with The Crafting Prompt, a crafting challenge for you and the little ones. Here's the first 4 weeks of crafts. Do visit Sarah's blog to find out more!


Cupcake Mumma

Paperhaul Reveal: Box 1

Crafty Creatives have kept us waiting and wanting and now finally we have the long awaited Paperhaul box in our stationery loving hands. Paperhaul is a monthly box filled with a selection of postcards, tags, tapes, cards and stickers with each month bringing a different theme to the box you receive. In my first box I've counted 12 items packaged in a flat parcel box perfect for those of us destined to almost always miss our postie. Least if you do, now you won't miss your stationery fix, because the Paperhaul box slides perfectly through the letterbox.

This months theme is travel and what says travel more than these lovely postcards. Several vintage inspired and one a more modern take on travel but all 3 printed on quality card ready to be placed in that big red box!


Three gift tags which i think are so cute and will add that special, unique touch to gifts


Two quality printed cards which come blank. I love blank cards because you never know when someone could use a bit of cheering up. I love the bicycle card and I know there are several people who would appreciate these through their mail box.


Vehicle inspired washi tape. I love washi tape but I am just too tight to spend £3 on various tapes so I often buy cheaper versions. The inclusion of washi tape was a real point for me when I described the contents and price to people curious about the box.


2 double sided craft papers. If you're like me you'll always have a preferred side with double sided papers and this is no exception. I like both sides but my favourite is the stamps and buildings. What's yours?


Finally, what's a stationery box without stickers?! And in this months box, Paperhaul have popped in some landmark stickers which I'm thinking of sticking onto my envelopes for my American pen pal who will love them.


I really can't wait to see what other themes Paperhaul come up with. I think travel was the perfect one to kick off their very first box. If you're interested in seeing what Paperhaul's future boxes have in store every month, they are priced at £10 plus p&p which I think is very reasonable. Each box sold also has 10p donated to the charity Post Pals which is a favourite charity of mine and is another reason to love Paperhaul for me. I've been very lucky to be chosen to blog the reveals each month and whilst my boxes will not be free I do receive them at a slightly reduced price. If you've received the first box, what do you think? I'd love to know!

Beautiful, Simple Notebooks by Personalise.co.uk

If you've been reading my blog or know me on line elsewhere for a while, then you'll know I love stationery. From wonderful writing paper, pretty pens and stickers to notebooks big and small. I have a fair few, some I still haven't written in but will be used in the very near future no doubt!

My most recent notebook has come from the lovely people at Personalise.co.uk who create personalised items for you and your loved ones. You can select a range of notebooks from hardback to spiral ones, a selection of different colours as part of the different ranges and of course you can personalise your notebook with your name and, if you so wish, a little saying underneath.


I'm not a fan of spiral notebooks so I chose a hardback notebook priced at £12.99. This notebook came with a choice of font colour (blue or pink) and as you can see I chose blue for a change. I'm really, really pleased with my notebook. Inside the pages are lined, I dislike blank pages in my notebook, I don't see the point in a notebook without lined paper. The personalising of the book let's everyone know it is in fact my book and nobody else's (looking at you Midge!) and a little favourite of mine is the ribbon attached so I don't go losing my place


The notebook came very handy at a recent blog event I attended and was the perfect size for my slightly-on-the-small-side sized handbag (another plus!) A big thank-you to Personalise.co.uk who sent me this notebook in exchange for an honest review.

Cupcake Mumma

Rainbow Fun!

Just before half term Midge had a very special delivery from Rainbow Belle. Rainbow Belle is a colourful little fairy that lives in Bellvue with her Magic Belle friends.

Midge and myself have spent many times together in their magical world and every month she receives a surprise pack from one of her fairy friends through the Flutterbud Club. It really makes her month.


We were sent a great, big package full of colour and sparkle from Rainbow Belle. Little A and Midge set to work on their projects:


After a lot of sticking and colouring they had both created a rainbow each which have been placed above my desk:

A pretty rainbow by Midge and A

Midge and I made the lovely wooden bunting together with some decorating help from A of course! I threaded rainbow coloured ribbon through the flags and we hung above Midges bed in her newly decorated bedroom.


Thank you to Magic Belles who supplied us with all our gorgeous craft goodies to make our bunting and rainbows.

CupcakeMumma

Make your own Windmill Toppers!


I've been up early this morning making some decorations for our upcoming BBQ party. I'm really looking forward to it and have been planning to add a real summer theme to the day. A part of this summer theme I thought I'd make some small windmills. These windmills don't move around (you need those what I call 'butterfly pins' for that) These are for creating something extra special for your cakes or to add to your display.

Here's what you need:


  • Take a small square of paper and draw 4, small lines from each corner to near the centre of the paper. It doesn't matter if each line is slightly shorter/longer than the other 
  • Carefully cut along the lines


  • In picture one, I have numbered the corners you need to fold
  • Fold the corners one by one using the sticky tabs to secure in the centre of the paper.
  • You now have your windmill!


  • Using the sellotape, place a stick (I used a stick made for cake pops!) securely to the back of your paper windmill
  • Add something extra to finish off the look (if you haven't pinned the centre instead)

I hope this tutorial was simple and easy to follow. I've made quite a few now as you can see. Children will love helping you make these. I haven't bought anything extra, I've used scrap papers, cake pop sticks (you could use cocktail sticks) and any extras from my craft box.

Enjoy!

CupcakeMumma

Crafty Creatives: A Favourite so Far!

This month the lovely people at Crafty Creatives have put together a rather sweet treat for us..Almost literally! I adore this box (CCBox 12) and have already been busy making things with the contents. Shall I show you what wonderful items we were treated to this month? Oh okay then!


How could I, Cupcake Mumma, not Oh and Ah and practically squeal with delight upon opening this latest box? We have this splendid art card which is just wonderful. I love the illustrations of the gummy bears, sweet jars and lollies. Also in the box is a recipe card from that lovely Cathryn Dresser of British Bake Off fame (I love that show), a mini cookie cutter (I received a heart shaped one) and some little embellishments for use on card, gift tags, fabric- anything really! 
In the final picture you can see ice cream buttons, cupcake ribbon in blue, tags to decorate and have fun with designing and some brightly coloured ring beads.

 Here is a close up of the full set of ice cream buttons. You can really jazz up an item of clothing, stick the ice cream firmly in place to the cone and loop through some chain for a unique necklace, or even snip the back off (carefully) to use as embellishments. The possibilities are endless!

Finally, the kit this month is a cross stitch kit with a variety of patterns to choose from. The kit comes with everything you need, as usual, even down to the little needle placed carefully in the fabric. Talking of fabric, included is a wonderful piece which I have forgotten to photograph! I'm sure someone will have a photo somewhere! The last treat in my box were 3 cakes which I have already turned into necklaces.


I think you'll agree that this is quite a fabulous box for June. Next month Crafty Creatives turn One! Look out for a truly great box I'm sure! As usual, I'm not sent these boxes to review. I pay for them and enjoy them as part of my crafting hobby and love to blog about them. I have inspired many a crafty mind to sign up so it's working!!

Have fun,
Cupcake Mumma x